Using the Online Video Recording Tool
|
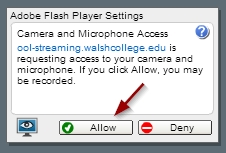
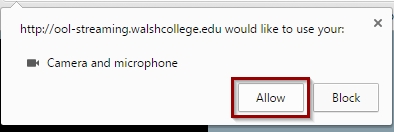
1. When you first open the online video recording tool, the Adobe Flash Player Settings pop-up will appear. Click "Allow" for the recording tool to access your Camera and Microphone. If you are using Google Chrome as your browser, the prompt to allow access may appear at the top of your browser's window. Be sure to click "Allow"
|
|
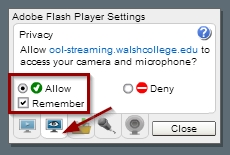
2. If you are prompted again to allow the recording tool to access your camera, check the box to "Remember", and Click "Allow".
|
|
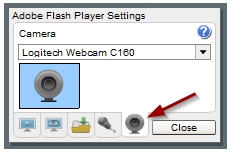
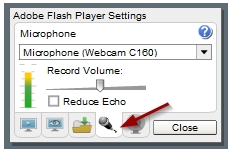
3. Clicking the Camera icon tab at the bottom (next to the close button) will present a drop-down selector for you to select the camera you are using to make your recording. Be sure the correct camera is selected.
|
|
4. Clicking the Microphone icon tab at the bottom (next to the camera tab) will present a drop-down selector for you to select the microphone you are using to make your recording. Be sure the correct microphone is selected!
|
Recording Your Video
As soon as you open the video recording tool, (and "allow access"), you will see a live view of your camera feed, so you can adjust the distance, room lighting, etc. You will also be able to test your microphone. If it is working properly, the blue volume bar at the bottom of the recording tool will move as you speak.
If your camera doesn't show the live view, or your audio is not working, please review the Troubleshooting section at the bottom of this page.
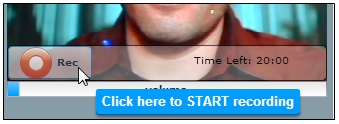 |
When you are ready to record, click the "Rec" button. |
 |
Once finished, press "Stop." |
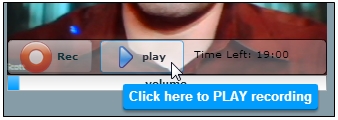 |
Then, to review your presentation, click the "Play" button. |
If you are not satisfied with your recording, you may re-record your video by selecting "Rec" again. Please Note: when you begin another recording, the system will erase your previously recorded video, creating a new one in its place.
Sharing your Recorded Video
|
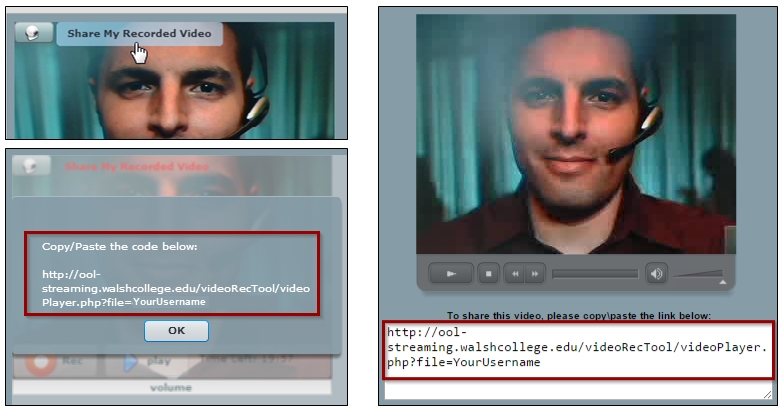
Once satisfied with your video, you will need to share it. To do so, you will need to copy and paste the video's URL code into your discussion board message, an email, or anywhere else your instructor requires.
To get your video's URL code, click the "Share My Recorded Video" link (on the recording screen), or press the Play button to find the same URL code just below your video on the playback screen. You can copy your code by first highlighting the code, then pressing Ctrl+C (or Cmd+C on a Mac), or by right-clicking with your mouse and selecting "Copy." To then paste the code, press Ctrl+V (Cmd+V on a Mac), or right-click where you want to paste the code and select "Paste."
|
 |
Troubleshooting
|
If you experience trouble getting your camera and microphone to work:
|
|
|
- Try exiting your internet browser entirely (closing all windows) - and then go back to the recording tool.
- Check the camera/microphone connections and reinstall all software/drivers accompanying the camera and microphone.
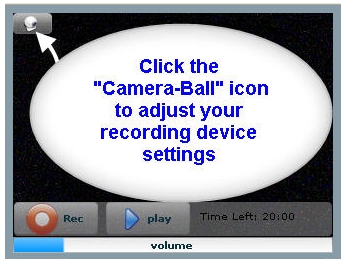
- Once you have done both of the above steps, be sure to click the "Camera-Ball" icon located in the top-left corner of the recording tool window. Doing so will re-open the recording tool preferences. Please go through each of the 4 steps listed at the top of this page.
- After completing all of these steps, you can contact Online Support. Please note: Online Support has no control over your browser's settings, or the operability of your microphone and webcam. It is your responsibility to be familiar with how your computer and its features function.
|
© Walsh College, All rights reserved