Please select from the following topics:
Getting Started 
This section of Zoom material will cover the following:
Downloading Zoom
- If Zoom is not already downloaded on your computer, visit https://walshcollege.zoom.us/ and click 'Sign in'. You should automatically be logged in using your Moodle credentials.
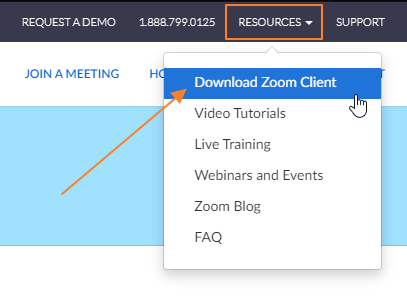
- From the 'Profile' landing page, look to the upper right hand corner of the page for 'RESOURCES' with a dropdown arrow. Move your mouse over 'resources', and click the first option, Download Zoom Client.
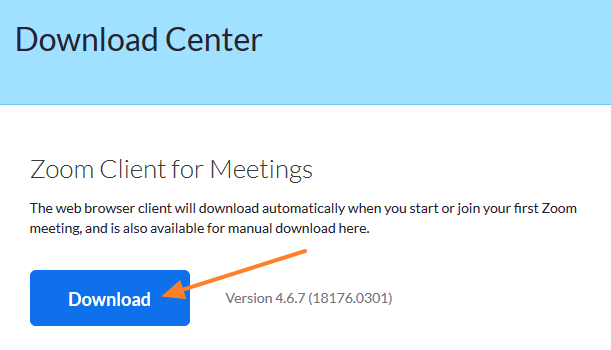
- Once on the next page, click the first download link available, labelled "Zoom Client for Meetings".
- Open the downloaded file and proceed to install Zoom.
Open Zoom & Logging in
- Open Zoom.

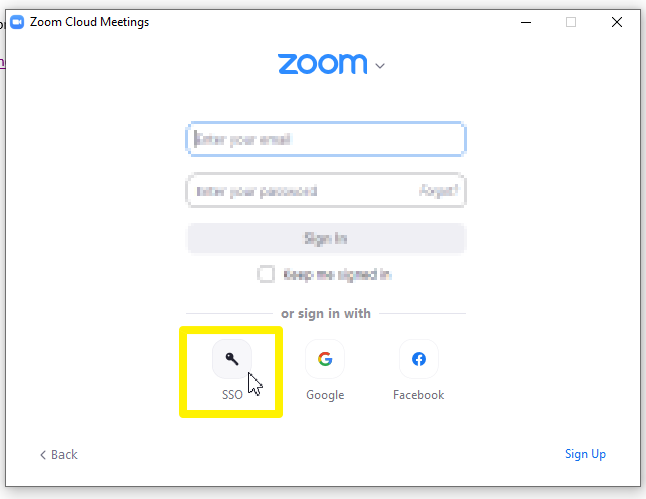
- If you're not signed in automatically, press 'Sign In', then press the SSO button.
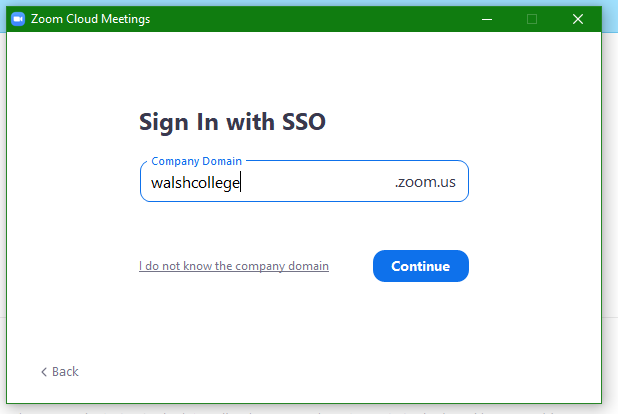
- If the Company Domain box is empty, type in "walshcollege" and press Continue.
- Log in using your Walsh username and password.
Joining A Session 
This section of Zoom material will cover the following:
- Testing your System
- Joining a Meeting
- Muting Yourself, Video On/Off
- Raising your hand, asking a question, thumbs up and thumbs down
- Using Chat Controls
Testing your System
- To test your Speaker and Microphone, first begin a New Meeting.
- Next, click on the Test Speaker and Microphone link.


- The speaker will be tested first. If you hear a ringtone, press 'Yes' and continue. If you do not hear a ringtone, select a different option from the "Speaker" dropdown menu until you hear the ringtone through your preferred speakers.
- For example, a laptop would likely have two options - one for the laptop speakers, and one for headphones when plugged in.

- Next, we will test the microphone. Speak into your microphone, wait a few seconds, and you should hear your voice echoed back through the speakers. If you do not hear your voice echoed back, select a different option from the "Microphone" dropdown menu until you hear your echo.
- The Microphone may have more than one option as well.
- Please note the microphone only records the first few seconds in a test, then stops recording. To try again, click on another microphone setting, then back to your preferred setting to perform the test again.

- Once both Speaker and Microphone are setup and testing well, proceed to click the blue Join with Computer Audio once.
- Press the blue Join with Computer Audio once more.
- A gray box will pop up stating 'You are using the computer audio', confirming you are connected using your computer's speakers and microphone.


Joining a Meeting
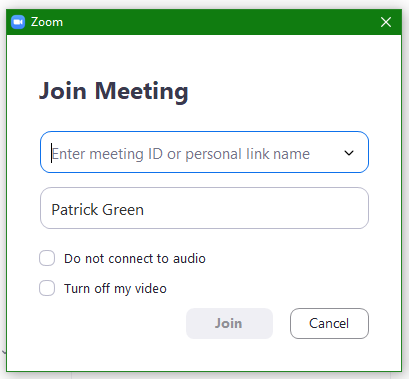
- A meeting can be joined easily by clicking on a link sent to you.
- Meeting ID's or Codes are located on the end of each link, such as: https://walshcollege.zoom.us/j/5868043105
- A meeting can also be joined by clicking the blue Join button on the Home tab of Zoom. With this tab, you can join the meeting with a Meeting code mentioned above.
- Note the meeting ID in the example link above would be displayed as 586-804-3105 in Zoom.

Muting Yourself, Video On/Off
- To mute yourself in Zoom, click on the Microphone button in the bottom left corner of your Zoom window.
- A Red slash means Muted, while the white Microphone alone means you are not muted.
- To turn your video on and off, click on the Camera button in the bottom left corner of your Zoom window.
- Likewise, a Red slash means No Video, while the white Camera alone means your video is on.
- Hover over the images to the right for helpful text.


Raising your hand, asking a question, thumbs up and thumbs down
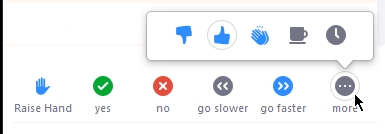
- Zoom allows you to participate with non-verbal feedback with the Host. First, click on Manage Participants
- Options include raising your hand, yes, no, as well as going slower and faster, among others.
- For full details, please see the Zoom page on Nonverbal Feedback During Meetings.

Using Chat Controls
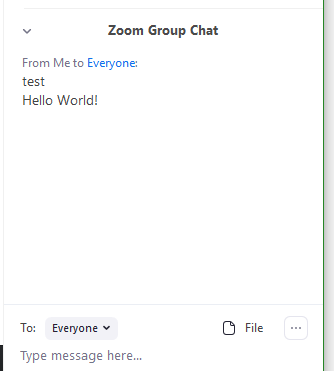
- Participants have the ability to use the Chat to type messages to one another.
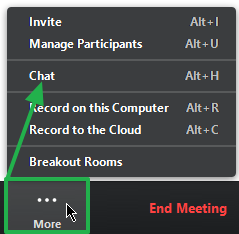
- Chat will not be open from the start. To open the Chat, click on the Chat button along the bottom bar. If your Zoom window is narrow, click on More, then Chat.
- These messages can be limited to no chat at all, the Host only, everyone publicly, or everyone both publicly and privately. Chat can also be saved.
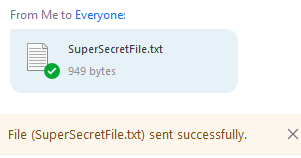
- You are also able to attach and share files in the chat by clicking on the paper icon.
- Further information can be found about In-Meeting Chat from Zoom.


Hosting a Meeting 
This section of Zoom material will cover the following:
- Hosting/Starting a meeting
- Schedule a meeting
- View and manage scheduled meetings
- Share a meeting invitation
- Security Icon
- Screen Sharing
- Using Drawing/Annotation Tools
- Changing the Host
- Managing Participants
- Recording your Session
- Sharing a Recording
Host/Start a meeting
- Launch Zoom

- Click the dropdown arrow next to 'New Meeting' and make sure the "Start with video" box is unchecked.
- Proceed to click the orange video button to begin a New Meeting.


Schedule a meeting
- Launch Zoom

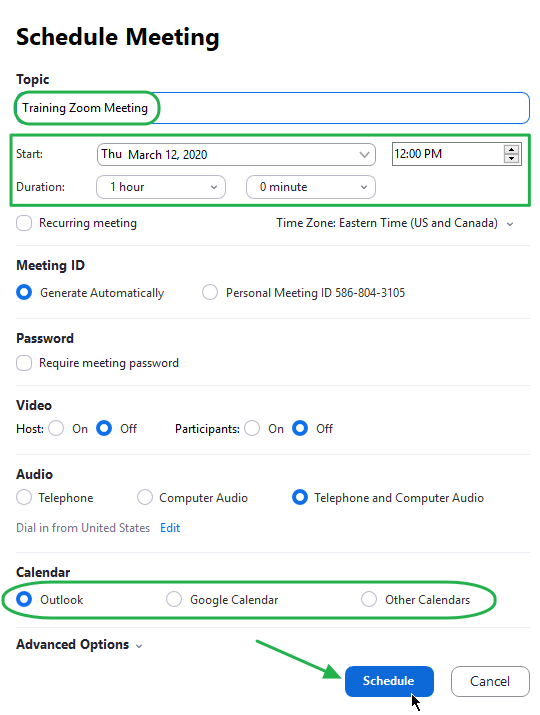
- Click the blue Schedule button.

- Configure Scheduled Meeting settings.
- Create a suitable Topic, designating the Date, Time, and Duration of your scheduled meeting.
- Outlook is selected by default, however if you intend to send meeting information by other means, select 'Other Calendars' to copy the meeting information.
- All other options can be left as default for now - they can be edited later.
- Press the blue Schedule button on the bottom - Wait a moment while the meeting is generated.
- Once scheduled with default settings, an draft email will be created in Outlook for distribution. This email can be sent out to invite recipients.
View and manage scheduled meetings
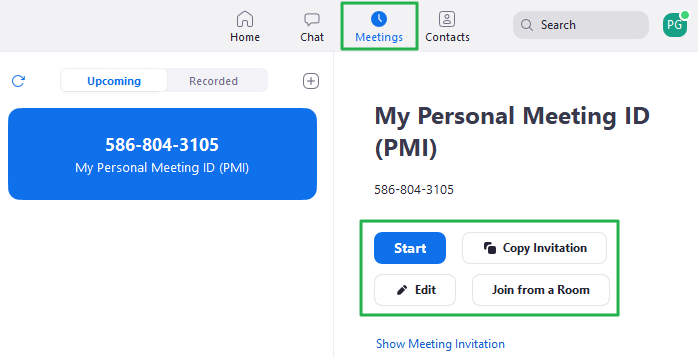
- Click on the Meetings clock at the top of the Zoom window to view upcoming meetings.
- The selected meeting may be started, invitation information copied, meeting settings edited, or you may join a session from a Room.
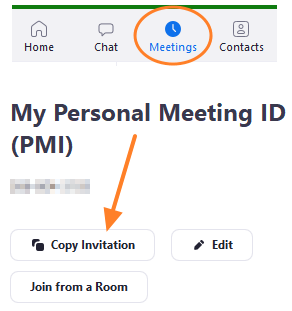
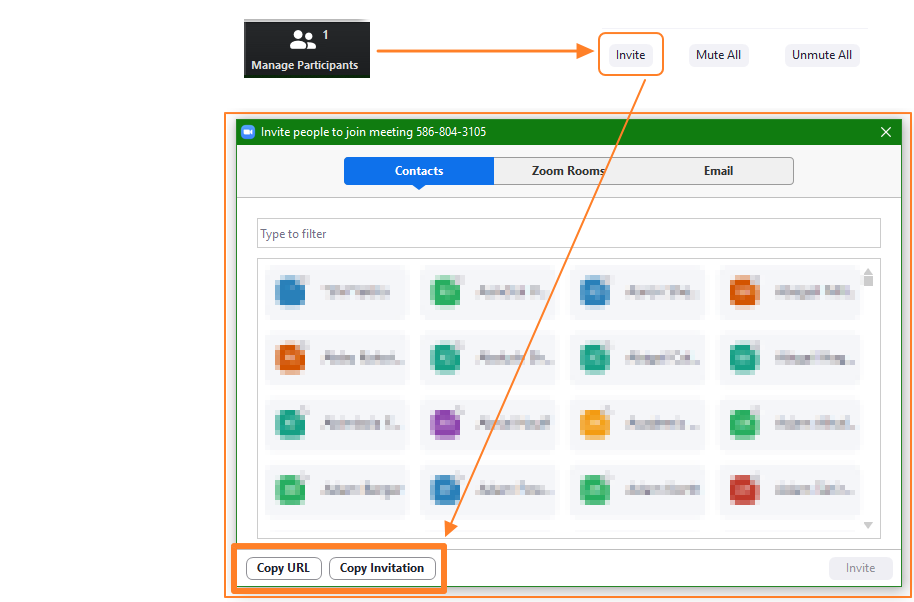
- To share a scheduled meeting or your Personal Meeting ID, press the 'Copy Invitation' button found in the 'Meetings' tab and share that text with your soon-to-be participants.
- Alternatively, pressing the 'Manage Participants' button while hosting a meeting offers an 'Invite' button, allowing you to copy the URL or entire meeting invitation details.
- Every way to share a meeting invitation is detailed in Zoom's documentation on Inviting others to join a meeting.
Security Icon
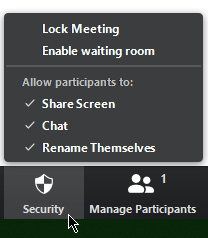
- Zoom has introduced prominent security settings directly in a meeting by clicking the Security Icon in the bottom bar of options.
- The Security Icon allows you to lock the meeting from additional participants joining, enable a waiting room, as well as allow or disallow the ability to share a screen, chat, or change names.
- For full details about the Security Icon, read Zoom's Blog Post about this recent update.
- Click the green 'Share Screen' option in the bottom-middle of the Zoom interface.
- Select the Screen or Program you would like to record.
A Screen will record anything and everything visible on the selected screen, whereas a Program (Such as PowerPoint or Excel) will only record information inside that program.
A desired program should be open before attempting to share that program using Zoom. - Click a screen or program, and press the blue 'Share' button. A colored border will appear around the selected screen or program.


Using Drawing/Annotation Tools
- To annotate in Zoom, Screen Sharing must be used. If you do not want to share a screen, select 'Whiteboard'. Please see Instructions above on how to Screen Share in order to draw, or annotate.
- With a shared screen, locate the black Control Bar on the top of your screen. This bar will hide automatically - move your cursor 'Up', like you are dragging it through the top of the screen, to see all options.
- Click on the Annotate pencil button.
- Once clicked, an additional bar of options will appear for annotation.


- These GIFs demonstrate the functionality of the annotation tools.
- Please read Using annotation tools on a shared screen from Zoom for details about each annotation tool.


Changing the Host
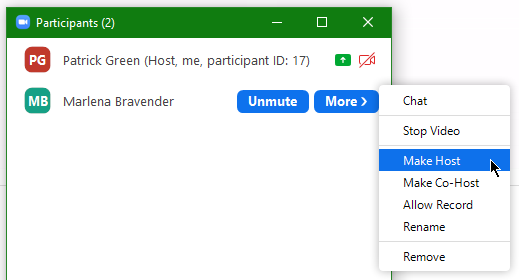
- Changing the Host gives another meeting participant full control over the Zoom session.
- To change the Host, click 'Manage Participants'.
- Locate and mouse over the participant to be made Host, then click the blue More button, and finally select 'Make Host' from the dropdown menu.
- For more information about Hosts and Co-Hosts, please read Host and Co-Host Controls in a Meeting.

Managing Participants
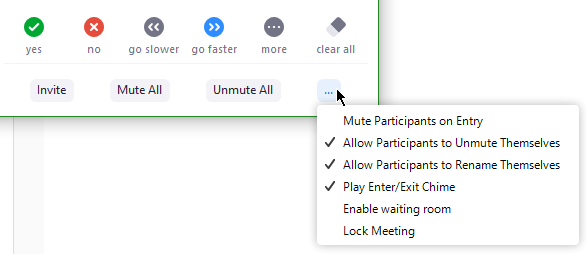
- Click on 'Manage Participants'
- Inside Manage Participants you have the ability to mute or unmute all participants, clear all non-verbal reactions, invite others, and control additional settings for all participants.
- For more information about Managing Participants, please read Managing Participants in a Meeting from Zoom.

Recording your Session
- Locate the black Control Bar on your screen. This bar will hide automatically - move your cursor 'Up', like you are dragging it through the top of the screen, to see all options.
- In the Control Bar, hover your mouse over 'More', and click either 'Record on this Computer', or 'Record to the Cloud', to begin recording.
- Recording to your computer will generate a local video file after completion, while Recording to the Cloud will save the video in the Cloud and e-mail you a link to watch once finished.

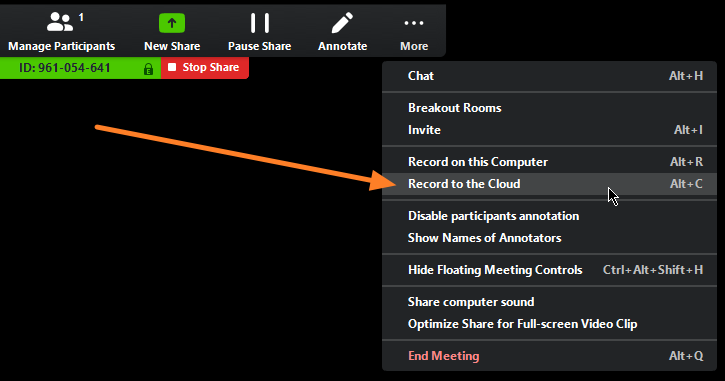
- Recording in progress is indicated by a small red dot with either a black circle outline around it (Computer), or a black cloud outline around it (Cloud), located next to your meeting ID and below the Control Bar.
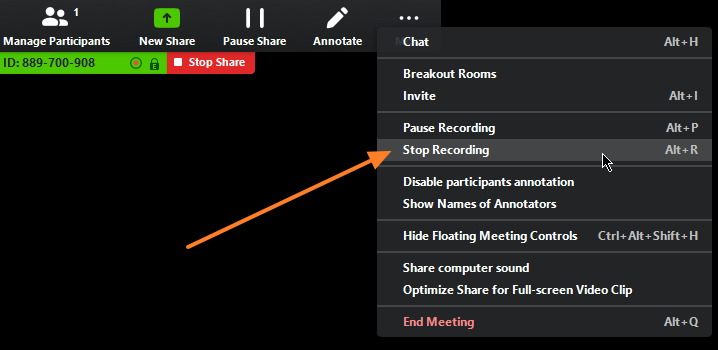
- The recording can be paused or stopped by navigating into the Control Bar, hovering over More, and clicking on Stop Recording.


- Computer recordings will process immediately after the meeting ends. The processing screen can be seen in the first image on the right.
- Once the computer recording is processed, the file containing the recording will be opened. The recording file to be shared is named zoom_0.mp4.
- If multiple recordings were created, they will be named in order, counting up from 0.


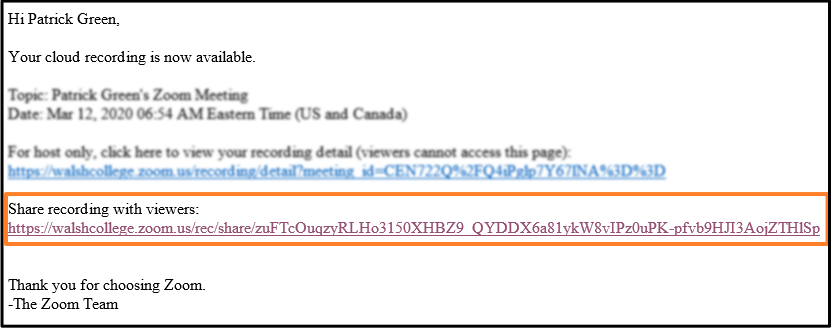
- Cloud recordings will process as soon as the recording is stopped. Please see the example email.
- To share your recording, copy and send the second link labeled Share recording with viewers.
- If multiple recordings were created, an email per recording will be sent.
- *Note: Cloud Recordings are deleted after 120 days
The Zoom App 
This section of Zoom material will cover the following:
- Download Zoom
- Logging into Zoom
- Joining a Meeting
- Provide Microphone, Camera, and Storage Permissions
- Zoom Desktop compared to Zoom Mobile App
Download Zoom
- Zoom, or Zoom Cloud Meetings can be downloaded for free in both the Apple App Store and Google Play Store on your mobile devices.


Logging in to Zoom
- When you first open the Zoom app, look to the bottom right of your screen and tap Sign In.
- Locate and tap the SSO option, under 'Or, sign in with', below the email and password fields.


- Next, in the companydomain field, type in walshcollege and tap Continue.


- Next, Type in your Walsh credentials and press Sign In.
- Upon successfully logging in you will be brought to the Zoom app home screen, labeled 'Meet & Chat'.
- Notice the same four buttons - New Meeting, Join, Schedule, and Share Screen are present.
- Notice Meetings is present and available in the bottom row as well.


Joining a Meeting
- A meeting can be joined easily by clicking on a link sent to you, such as from your Walsh email accessed on your mobile device.
- To Join a meeting on Zoom Mobile, tap on the blue Join button.
- Enter your meeting ID. Meeting ID's or Codes are located on the end of each link, such as: https://walshcollege.zoom.us/j/5868043105
- Note the meeting ID in the example link above would be displayed as 586-804-3105 in Zoom.
- Optionally, you can opt to not connect your Audio or Video when joining a meeting.


Provide Microphone, Camera, and Storage Permissions
- Once you have joined a meeting, the Zoom App will notify to allow microphone, camera, and storage permissions on your mobile device.
- Press Got it to dismiss this message, and proceed to allow permissions as necessary.
- Attempting to Join Audio should trigger the microphone request permission, and attempting to start video should trigger the camera request permission.
- These permissions will only need to be given once for the Zoom App.
- Once permision has been given, Audio and Video can be toggled on or off just like the Desktop version of Zoom.

Zoom Desktop compared to Zoom Mobile App
- For a full list of what the Mobile app is capable of compared to the Desktop client, Please see the Desktop client and mobile app comparison provided by Zoom.
Get Help 
Here are helpful links for working within Zoom that you may find useful:
- Getting started
- Screen sharing
- Whiteboarding
- Annotation
- Breakout Rooms
- Virtual backgrounds
- In-meeting chat
- Cloud recording
Help for Students: please visit Zoom's Support Documentation for guidance. For personal technical support, please visit Zoom Video Communications Technical Support.
Help for Faculty: please contact zoomtraining@walshcollege.edu.