Please select from the following topics:
Installing the Moodle Mobile App on Android Devices 
These Instructions provide a step-by-step walk through of how to download the Moodle Mobile App on Android devices that have access to the Google Play Store. This process will involve downloading one app, and using your device's web browser to log into Moodle once during setup. Once you are logged in on the app, you will not have to log in again until your password is changed.
Step 1: Google Play Store and Downloading Moodle Mobile
First, locate and launch your Google Play Store app.
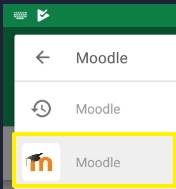
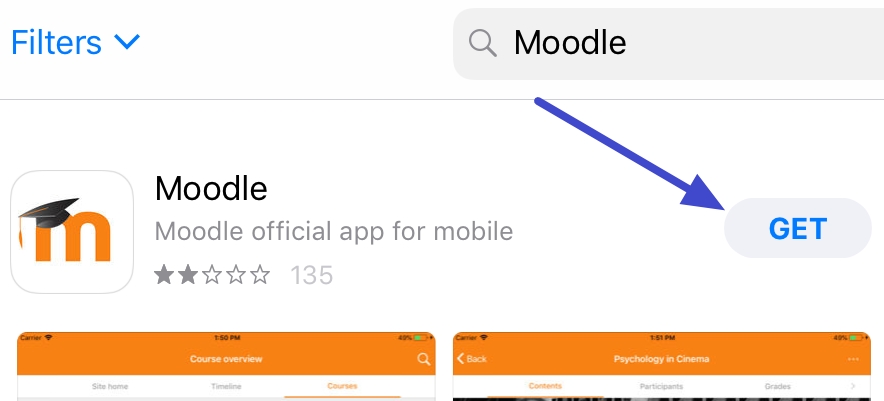
Next, Search for the "Moodle" app.
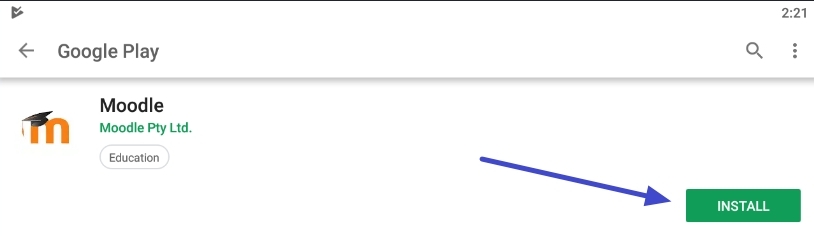
On the Moodle app page, Tap the green "INSTALL" button to download and install Moodle.
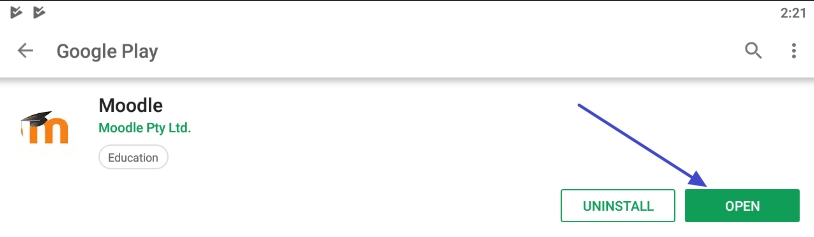
Once the app is finished installing, tap the green "OPEN" button to launch the app.
Step 2: Logging Into the Moodle Mobile App
When starting Moodle for the first time, we recommend allowing notifications if Moodle Mobile requests it so you can be notified of course events.
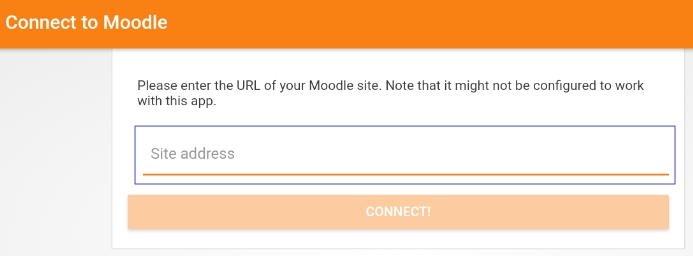
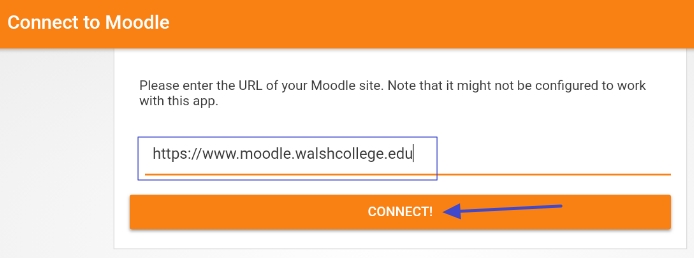
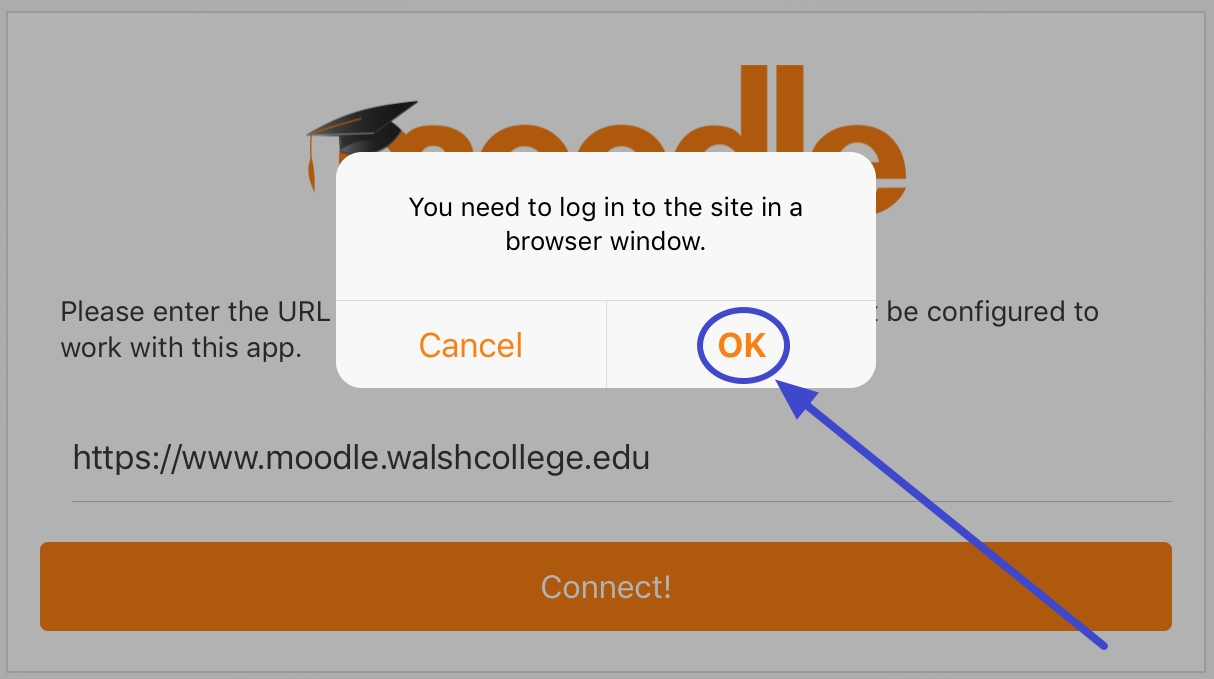
On first launch, the App will request the web address to our Moodle site. type "https://www.moodle.walshcollege.edu" and then press the "CONNECT!" button below.
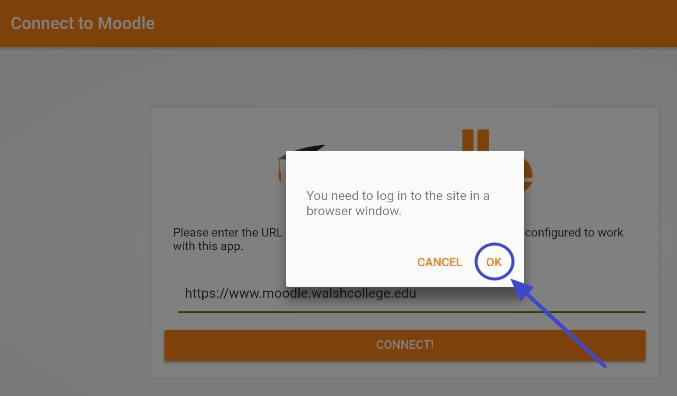
Once you press connect, as long as the website address was typed in correctly, your screen should pop up a white box requesting you to log in to the site in a browser window. Press "OK".
Once you press OK, it should automatically change apps to the web browser on your device, and take you to the Moodle website.
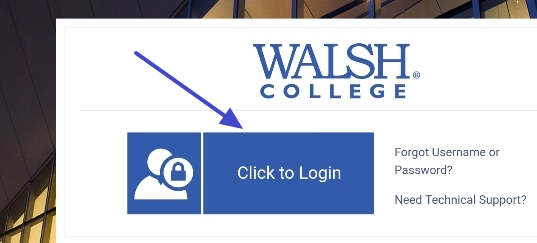
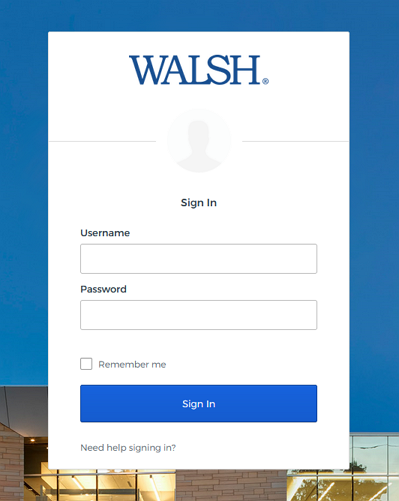
Now that we are on the Moodle website in the browser on your device, we must log in. Click on the large blue "Click to Login" button.
Next, type the same username and password you would use to log into Moodle on the computer. This is the same username and password to access the WebAdvisor Portal.
If your credentials are correct, pressing the "Sign In" button should automatically transfer you back to the Moodle Mobile app within a few seconds.
Step 3: Successfully logged in
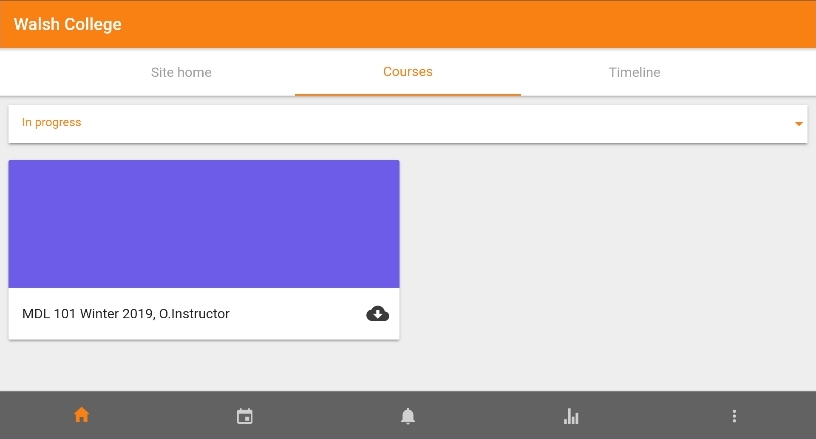
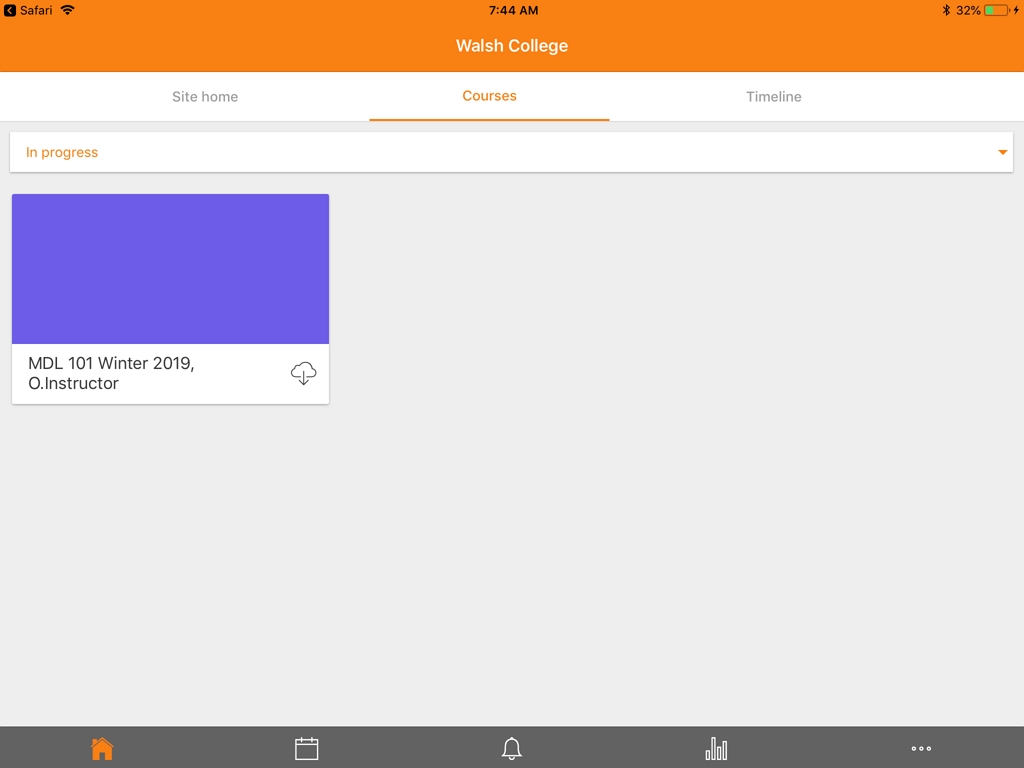
After being transferred back to the Moodle Mobile App, you should now see your courses listed if successfully logged in. Here we have 1 course, which is MDL 101.
Congratulations, you are now ready to use Moodle on the go!
© Walsh College, All rights reserved
Installing the Moodle Mobile App on iPhone and iPad
These Instructions provide a step-by-step walk through of how to download the Moodle Mobile App on an iPhone or iPad. This process will involve downloading one app from the App Store and using your Safari web browser to log into Moodle once during setup. Once you are logged in on the app, you will not have to log in again until your password is changed.
Step 1: App Store and Downloading Moodle Mobile
First, locate and launch the App Store.
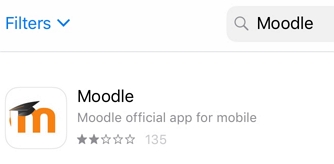
Next, Search for the "Moodle" app.
After searching, Tap the "GET" button to download and install Moodle.
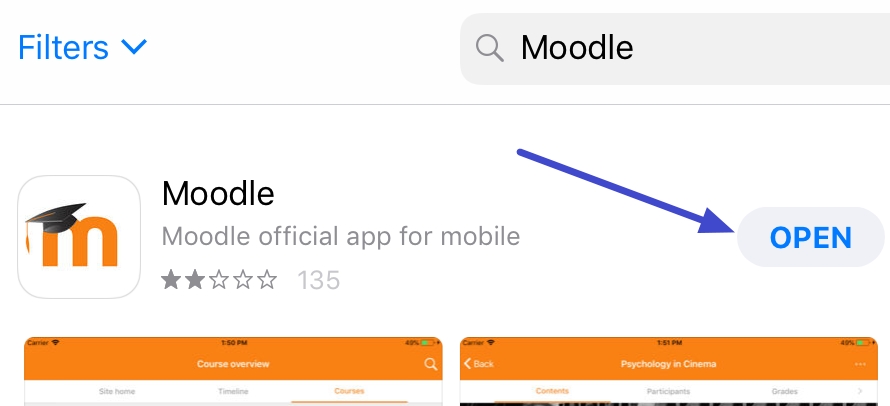
Once the app is finished installing, tap the "OPEN" button to launch the app.
Step 2: Logging Into the Moodle Mobile App
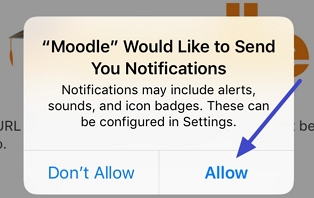
When starting Moodle for the first time, we recommend allowing notifications so you can be notified of course events.
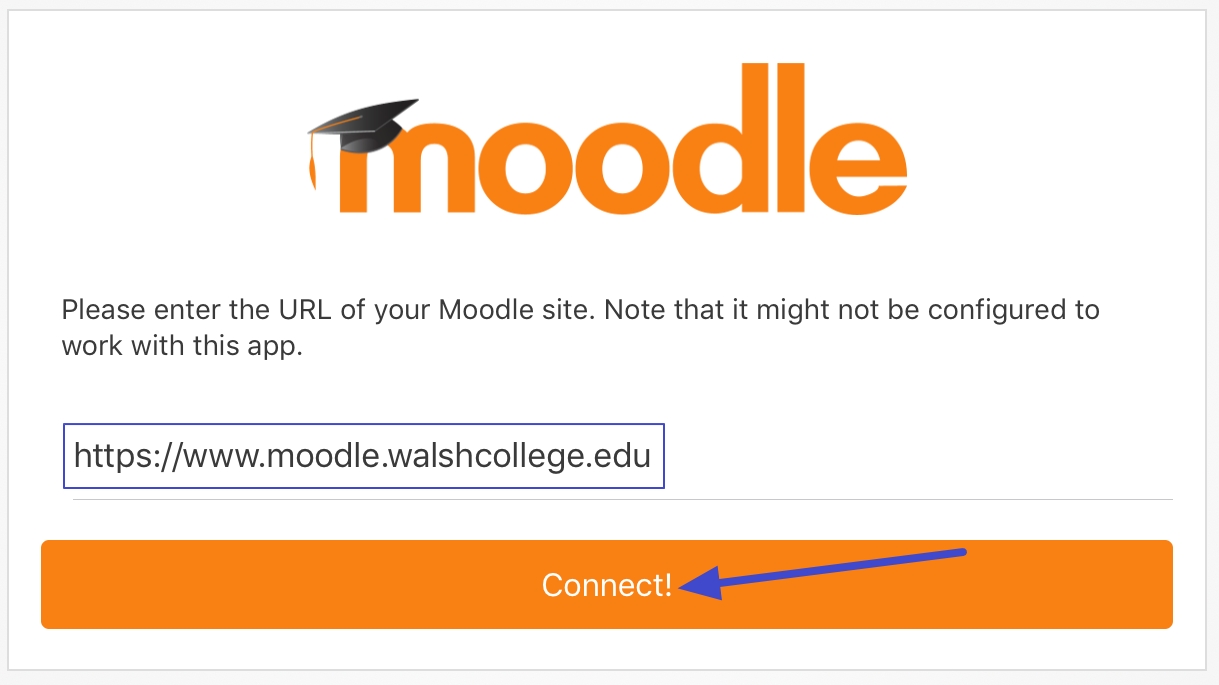
On first launch, the App will request the web address to our Moodle site. type "https://www.moodle.walshcollege.edu" and then press the "Connect!" button below.
Once you press connect, as long as the website address was typed in correctly, your screen should pop up a white box requesting you to log in to the site in a browser window. Press "OK".
Once you press OK, it should automatically change apps to the Safari web browser on your iPhone/iPad, and take you to the Moodle website.
Now that we are in Safari on your iPhone/iPad, we must log in. Click on the large blue "Click to Login" button.
Next, type the same username and password you would use to log into Moodle on the computer. This is the same username and password to access the WebAdvisor Portal.
If your credentials are correct, pressing the "Sign In" button should pop up a message to Open this page in "Moodle". Press the "Open" button and you should taken back to the Moodle app.


Step 3: Successfully logged in
After being transferred back to the Moodle Mobile App, you should now see your courses listed if successfully logged in. Here we have 1 course, which is MDL 101.
Congratulations, you are now ready to use Moodle on the go!
© Walsh College, All rights reserved
Setting up Mobile Notification Preferences
This short lecture will show you how to adjust Moodle Mobile settings through Moodle while logged in on the computer. These are the settings Walsh recommends you enable for the best experience on mobile.
Step 1: Navigate to Preferences
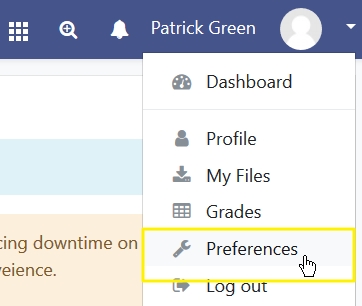
To edit your preferences, click on your name in the upper right corner of Moodle and click "Preferences" from the drop down menu.
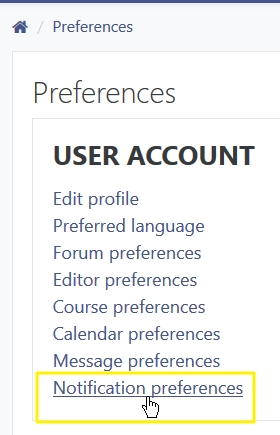
After clicking Preferences, click "Notification preferences" at the bottom of the 'User account' group of options.
Step 2: Change Mobile Notifications
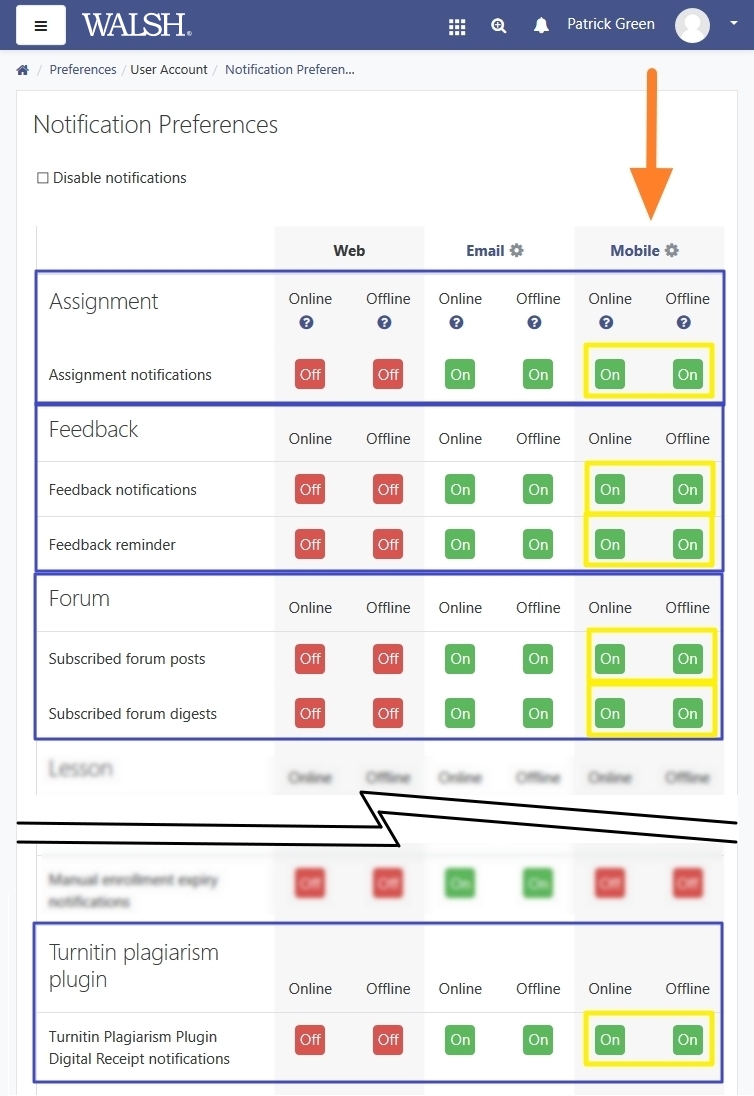
In Notification Preferences we would like to change a few of the Mobile  Notification buttons from Off to On, or Red to Green.
The settings that we want to click on are located within the blue box, and highlighted with a yellow box around them.
Using the image to the right, click only the Red boxes that are highlighted in yellow so they become Green boxes.
The image to the right is how your screen should look once finished. There are 12 boxes in total that should be clicked from Red to Green, which are:
- Assignment Notifications
- Feedback Notifications
- Feedback Reminder
- Subscribed Forum Posts
- Subscribed Forum Digests
- Turnitin Notifications
Once you have verified all 12 boxes have been changed, you are all set in configuring the notifications for Moodle Mobile!
© Walsh College, All rights reserved
Calendar & Event Notifications
This brief lecture will show you how to adjust Calendar Event Notification settings in Moodle mobile.
Viewing Calendar Events
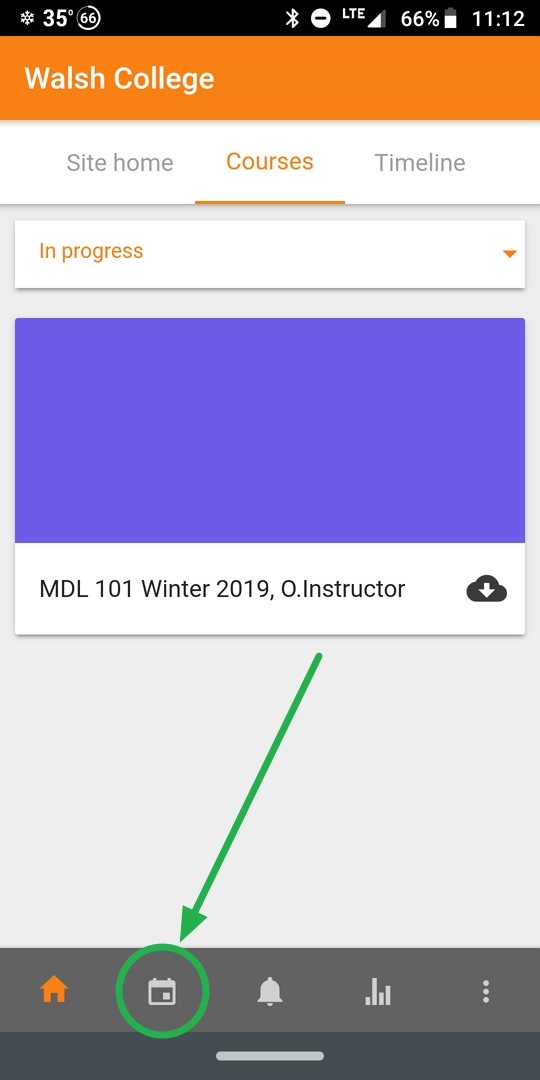
First, Launch the Moodle Mobile App.
To view calendar events, press on the calendar icon at the bottom of the screen.
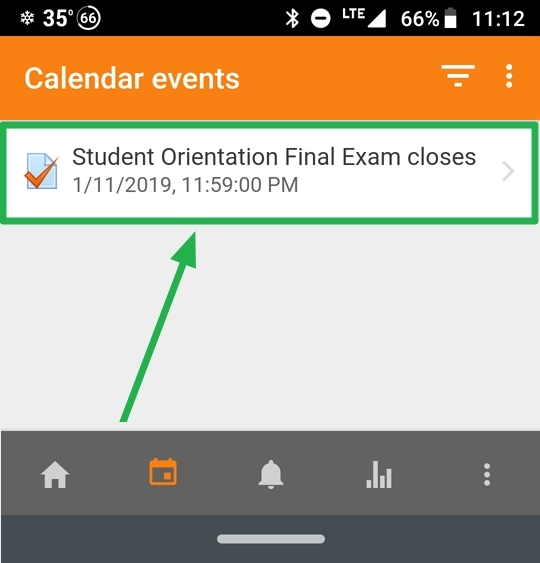
After pressing the calendar icon at the bottom, we see one Event: the Student Orientation Final Exam for Moodle 101.
Calendar events with the closest due date are located at the top of the list.
Next, click on one of the events.
The Notification setting allows you to choose how far in advance your phone or tablet notifies you of a calendar event, such as an assignment being due. By default it is set at 1 hour, but can be set as far ahead as 1 day.
Note: All events will default to 1 hour unless adjusted in the app. For example, if you wanted to be reminded a day in advance of a quiz, you would need to adjust the notification setting for each calendar event that pertains to a quiz to 1 day.
At the time of the event, Moodle will push a notification to your device which acts as a shortcut to the calendar event in the app.
Once an item becomes due, it will disappear from your calendar Event list. The calendar Event list will refresh automatically when the app is re-opened, or can be refreshed by swiping down.

Receiving and viewing Notifications
With your calendar reminders and your notification preferences turned on from the previous lecture, we are ready to receive notifications on Mobile.
Notifications will come to your device like any other app: press the notification and it will launch the Moodle Mobile app, taking you to the relevant material.
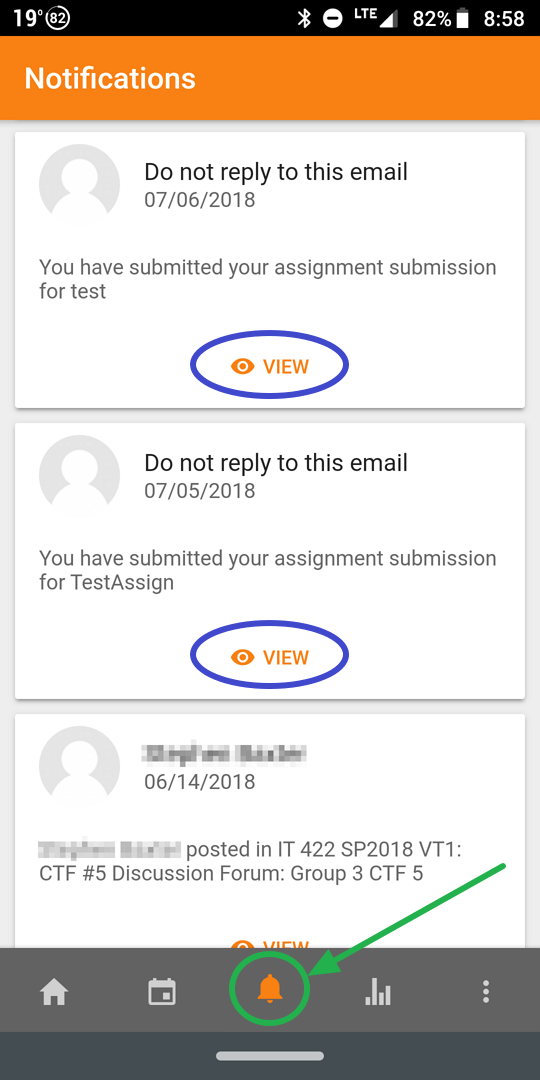
If you missed or dismissed the notification, past notifications can be seen using the bell icon located next to the calendar. Press "View" to follow the notification to a course page. Some notifications just provide information and cannot be followed, such as a delivery receipt from Turnitin.
© Walsh College, All rights reserved
Uploading Files using the Moodle Mobile App
This lecture will show you how to upload files through the Moodle Mobile App for use with Moodle on the computer.
Uploading files through the Moodle Mobile App
First, Launch the Moodle Mobile App.
Next, tap on the three dots icon in the bottom right corner of the app.
After tapping on the three dots, tap "My Files" beneath your name.

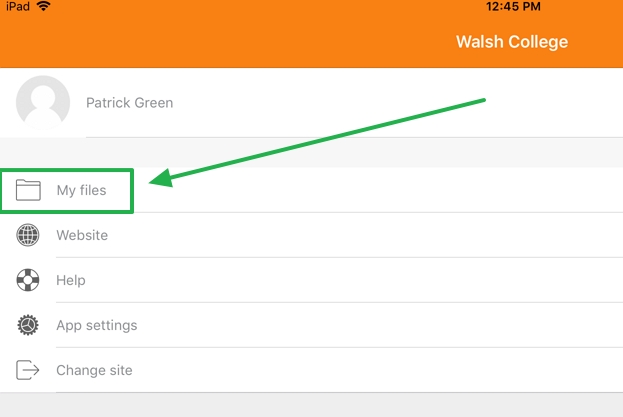
After tapping on "My Files", look to the bottom right of your screen for a button with a + on it. This button is for adding a file to your Moodle account.
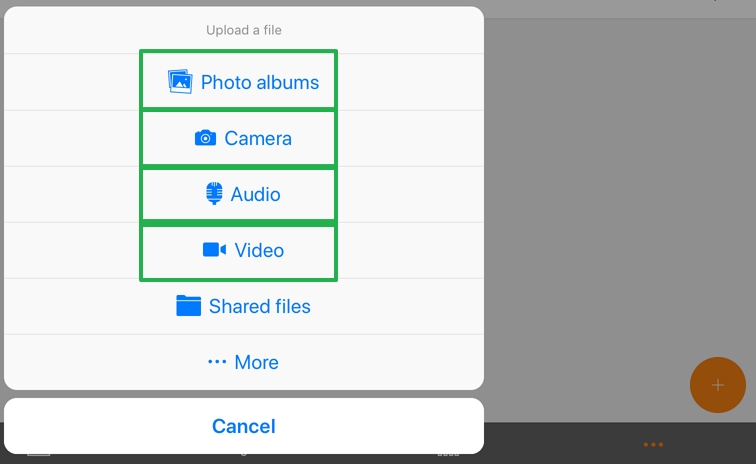
Once you tap the plus button, a menu pops up asking how you would like to upload:
- Photo Albums - Upload an existing photo you have already taken.
- Camera - Take a photo now and upload it right after.
- Audio - Record audio now and upload it right after.
- Video - Take a video now and upload it right after.
Android devices optionally have the ability to upload files as well.

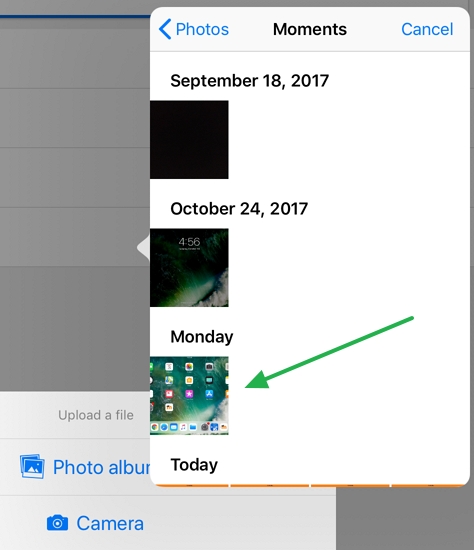
For this example, we will upload an existing picture we have already taken with the 'Photo Albums' option. Be sure to allow access to your Photos so Moodle can upload the image.
On an iPad, tapping 'Photo Albums' will pop up a box above it with your photos. Tapping on a photo will upload it right away.
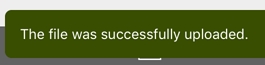
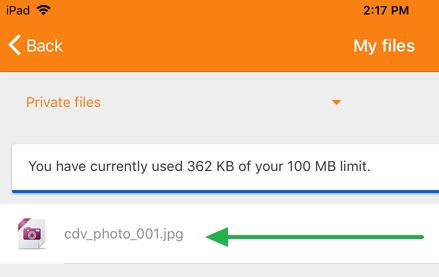
The upload is complete when you receive a message saying "The file was successfully uploaded".
You should now see your uploaded file in 'My files'. Here, mine is called "cdv_photo_001.jpg".
Record and Upload Audio through the Moodle App
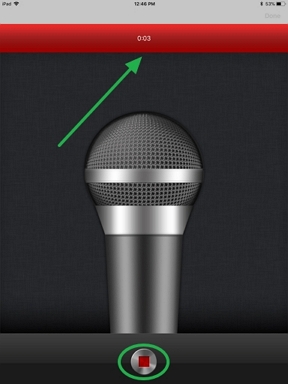
To upload and record audio, reference and select the third option in the list above, labeled "Audio". On iPhone and iPad, this will open a microphone seen in the image to the right automatically. On an Android device, you will need to download an audio recording app before attempting to use the Audio option.
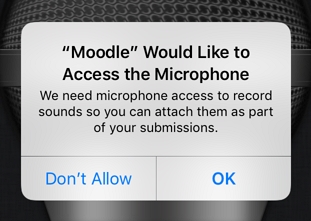
In order to record, the App needs permission to use your Microphone. Press "Allow" if it asks to use the Microphone.
After allowing microphone access, you are ready to record. Press the red button at the bottom to begin recording. While recording, you should see a red timer at the top count upwards while recording. To end the recording, press the same red button on the bottom.
Once you have stopped recording, press the blue "Done" button in the upper right corner. If this button is not blue, the recording is still going. Stop the recording, and press "Done" to continue.
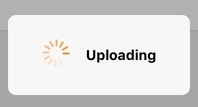
Once the "Done" button is pressed, the audio recording will immediately upload to Moodle. It should appear in your file list much like the image we uploaded a few steps ago.
Managing Files with Moodle on a Computer
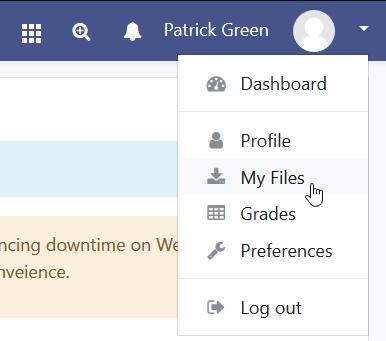
Now let's set down your mobile device and use the computer to access Moodle. To view the files we just uploaded, click on your name in the upper right corner of Moodle and select "My Files".
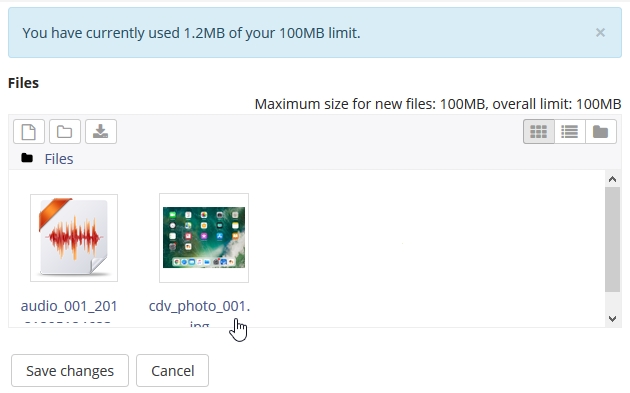
Inside my files we can see that the audio recording and photo we uploaded are in Moodle. To modify a file, click on it.
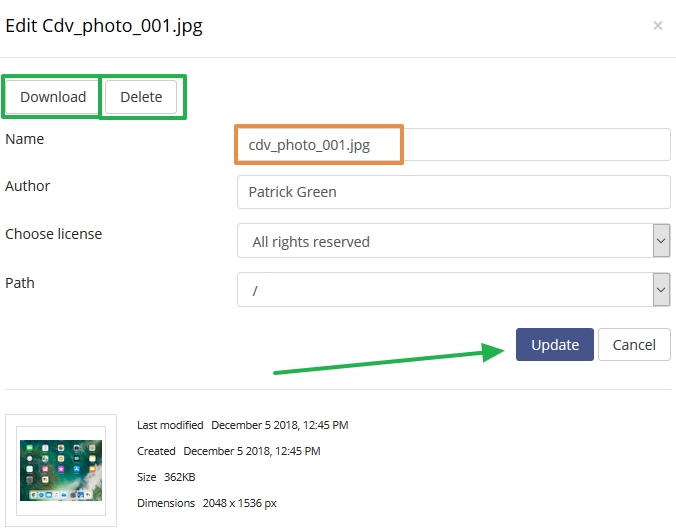
Once you click on a file, you have the option to Download, Delete, or rename the file. If you delete or add a file, be sure to press the "Save changes" button to confirm the addition or deletion.
If changes to a file are made, be sure to press the blue "Update" button to update the settings.
Using Files with Moodle on a Computer
Since we have an image and a recording in our Moodle files, we can use them to contribute to a discussion board or an assignment. In this example, we will share an image to a discussion board. You can test this in Moodle 101's sample discussion board too.
First, locate the discussion board you wish to post in and begin a new topic by pressing "Add a new discussion topic".
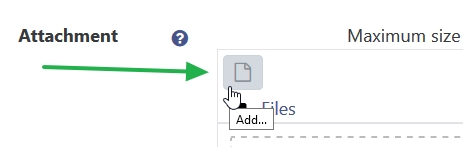
When creating the discussion topic, scroll past the subject and Message and focus on the 'Attachment' section. Press the white paper icon in the upper left corner to begin attaching files.

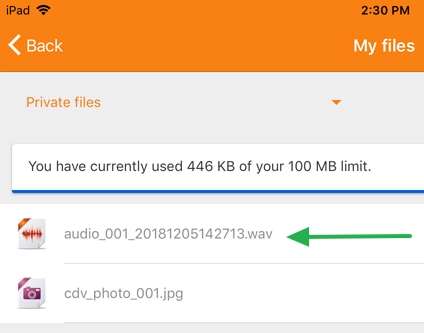
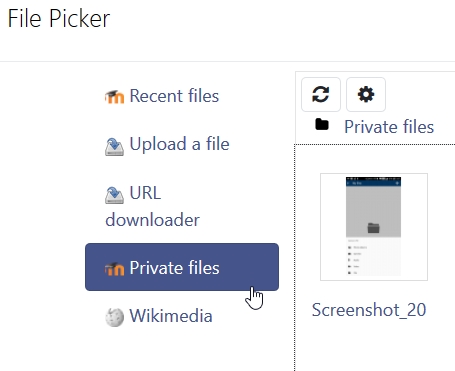
Pressing the white paper icon opens the File Picker, enabling you to pick a file to use. Click on "Private files" in the list to the left, and a file you would like to use.
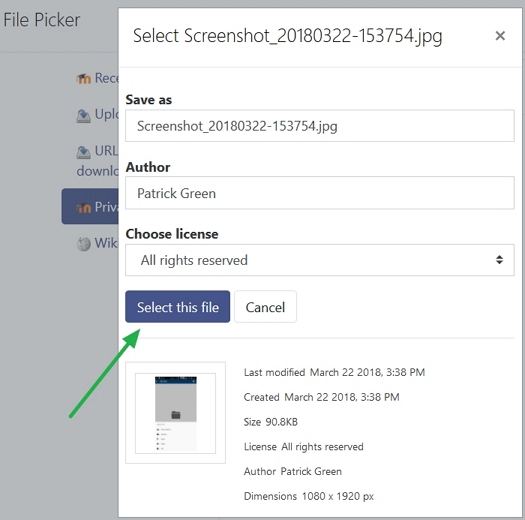
Once you click on a file, another box will pop up, allowing you to change the name of the file and verify it is correct. Once you are all set, press the blue "Select this file" button. Note: this upload process is identical for assignments!
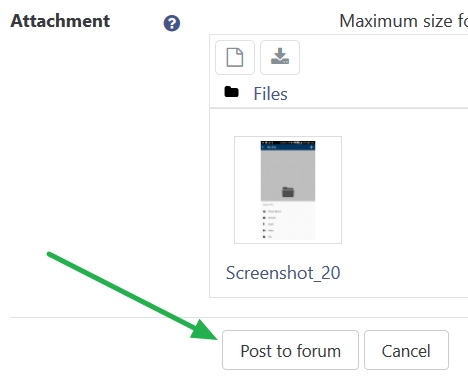
After the file has been selected, you should see the image in the box next to 'Attachment'. Fill in the subject and messages areas of the discussion board, and "Post to forum" with your attached file!
You can verify the file has been attached by revisiting the forum post you just created, and looking beneath the 'message' portion for the attached file.
© Walsh College, All rights reserved