Audio, Video Feedback on Assignments
With our latest Moodle upgrade you now have the ability to easily record an audio or video feedback message (up to two minutes) for your students and add it to the 'Feedback comments' section - See instructions below:
Just audio, or Video too?
Click the Microphone button for audio-only recording, or the Camera for both video and audio recording.

Let's (almost) start recording
Press the long 'Start Recording' button to begin the process. Please note that the recording will not start immediately - your browser must ask permission to use your Microphone or Camera first.
Note that your recording choice - audio or video - can be seen in the upper left corner.


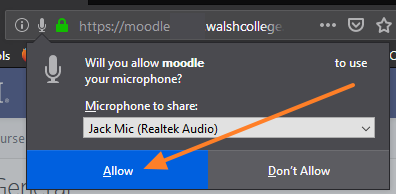
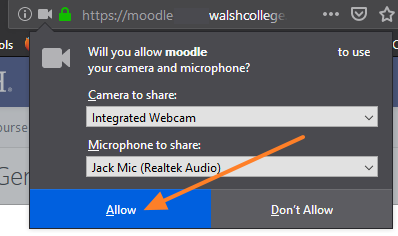
Giving Permissions
Press 'allow' to any prompts asking to use your camera or microphone that will appear near the upper left corner of your browser window.
There should be two pop-up prompts at most - one for the microphone, and another for the camera.
And, Action!
Recording should begin immediately after permissions are provided. Please note that both Audio and Video recordings are limited to two minutes in length, and the 'start recording' button will change to a 'stop recording' button with a timer displaying the time remaining.
Once finished with your recording, press the red 'Stop recording' button.

Review and Attach
Once the recording has taken place you have the ability to listen or watch your recording before attaching.
Press the red 'Record again' button if you'd like to re-record, repeating the above steps, or press the blue 'Attach recording' button to attach it into the annoucements block.

Don't forget to save!
With your recording completed and attached, don't forget to press the 'Save changes' or 'Save and show next' button to save any audio, video, or text feedback.
